Products Guides
Ostomy pouching systems
An evidence-based guide to ostomy pouching systems: one-piece vs two-piece, drainable vs closed, flat vs convex, plus accessories and troubleshooting.
On this page
- The two main parts of every pouching system
- Choosing between one-piece and two-piece systems
- One-piece systems
- Two-piece systems
- Drainable, closed, or urostomy pouches
- Drainable pouches
- Closed-end pouches
- Urostomy pouches
- Flat vs convex skin barriers
- Flat barriers
- Convex barriers
- Skin barrier wear time and adhesives
- Pouch features that matter day to day
- Filter
- Skin-side material
- Window or transparent vs opaque
- Outlet style
- Pre-cut vs cut-to-fit barriers
- Useful accessories
- Barrier rings
- Barrier paste or strip paste
- Stoma powder
- Skin-protective sprays and wipes
- Adhesive remover (sprays, wipes, liquids)
- Belts and wraps
- Deodorisers
- Convex inserts
- How to measure your stoma
- How to apply a pouching system
- Troubleshooting common problems
- Frequent leaks
- Skin irritation or rash
- Itching under the barrier
- Ballooning (gas inflating the pouch)
- Pancaking (output sticking to the top of the pouch)
- Odour outside the pouch
- Where to get supplies
- The bottom line
An ostomy pouching system is the equipment worn over a stoma to collect output and protect the surrounding skin. Every system has two parts: a skin barrier that sticks to the abdomen and a pouch that holds output. Systems are either one-piece (barrier and pouch joined) or two-piece (separate, clicking together), with pouches that are drainable, closed-end, or urostomy, and barriers that are flat or convex.
The pouching system is the single most important factor in living comfortably with a stoma — and getting it right transforms quality of life. A good system disappears under clothing, lasts a predictable number of days, and keeps skin completely healthy. A poor one causes leaks, irritation, broken sleep, lost confidence, and constant worry.
The good news: most pouching problems are solvable, often with simple adjustments. This guide covers the main types of pouching systems, the most useful accessories, how to measure a stoma, and how to troubleshoot the most common issues. It is written for new ostomates, family members, and anyone helping a loved one navigate the first months after surgery.
The two main parts of every pouching system
Every pouching system has two functional components:
- A skin barrier (sometimes called the wafer, flange, or base plate) — the part that sticks to the abdominal skin around the stoma. The barrier has a precisely sized opening that fits around the stoma; the rest seals against intact skin and protects it from output.
- A pouch — the bag that collects output. Some pouches have an opening to empty (drainable), others are sealed for single use (closed-end), and some have a tap or valve (for urostomies).
In a one-piece system these two parts are bonded together in the factory and discarded together at every change. In a two-piece system they are separate components that connect with a click ring or an adhesive coupling, so the pouch can be swapped without disturbing the skin barrier.
Choosing between one-piece and two-piece systems
Both work well. The choice usually comes down to skin tolerance, lifestyle, and personal preference.
One-piece systems
- Slimmer profile — sits flatter under clothing
- Simpler — fewer steps at each change
- Single unit — no clicking, lining up, or coupling
- Every change disturbs the skin (the barrier comes off each time)
- Better suited to fewer changes per week
Two-piece systems
- Skin-friendly — the barrier stays put for several days while only the pouch is changed
- Versatile — swap a drainable pouch for a closed-end one, an opaque pouch for a transparent one, etc., without disturbing the skin
- Slightly thicker profile because of the coupling ring
- Better suited to sensitive skin, frequent pouch changes, or specific scenarios (e.g. swimming with a closed-end pouch)
Many people use both: a two-piece system at home, a one-piece system for travel and special occasions where a slim profile matters more.
Drainable, closed, or urostomy pouches
There are three pouch styles, each suited to a different output type.
Drainable pouches
The most common pouch for ileostomies and many colostomies. The bottom of the pouch has an opening that is opened, drained into a toilet, wiped, and closed again — usually with an integrated clip, Velcro strip, or roll-and-tuck closure. Drainable pouches are designed to be emptied multiple times a day.
Closed-end pouches
Used most often with sigmoid colostomies and descending colostomies where output is firmer and less frequent. The pouch is sealed at the bottom and the whole pouch is discarded and replaced when full. Most people change closed-end pouches 1 to 3 times a day. Useful for swimming, intimacy, or any time emptying is impractical.
Urostomy pouches
Have a tap or valve at the bottom to drain urine, plus an internal anti-reflux barrier to stop urine from flowing back across the stoma. Most urostomy pouches also have a connector at the bottom that attaches to a larger night drainage bag, allowing uninterrupted sleep.
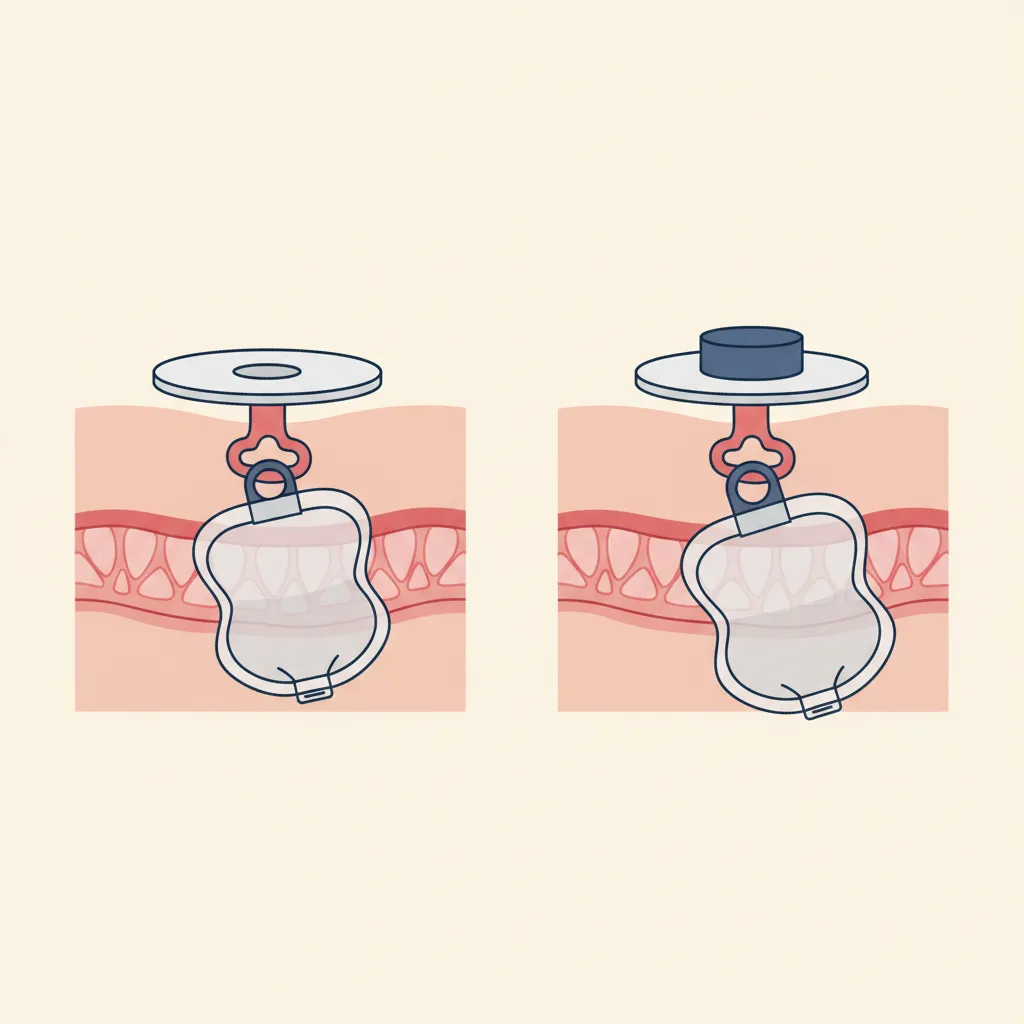
Flat vs convex skin barriers
Flat barriers
The default — a flat skin barrier sits against the abdomen like a sticker. Flat barriers work well when the stoma protrudes above the skin and the surrounding abdomen is reasonably level. Most people start on a flat barrier in hospital.
Convex barriers
The barrier is built with a dome shape that pushes inward against the skin around the stoma. This:
- Eases the stoma slightly outward so output drops cleanly into the pouch
- Improves the seal against retracted, flush, or uneven stomas
- Fills in skin creases, scars, or soft spots around the stoma
Convex barriers come in different depths (light, medium, deep) and shapes (oval, round, kidney). Choosing the right convex profile is usually best done with a stoma care nurse, because a barrier that is too convex can cause skin injury from excessive pressure.
A common pattern in the months after surgery is to start flat and transition to convex as the stoma settles into its final shape. About 30–40% of long-term ostomates use a convex system.
Skin barrier wear time and adhesives
Skin barriers are made from a hydrocolloid material that absorbs moisture (sweat and small amounts of output) and seals against the skin. Two main wear-time categories exist:
- Standard wear — designed for one to three days
- Extended wear — formulated to resist breakdown for three to seven days, particularly useful with ileostomy and urostomy output
Extended wear barriers are not automatically better. People with formed colostomy output usually do fine on standard wear, and frequent changes have the benefit of keeping skin under regular visual review.
A few common adhesion problem patterns:
- Adhesive lifts at the edges within a day or two — usually means the barrier is too thin for the output type, or the wear time is being pushed too long
- Melt-out around the stoma opening — output is undermining the barrier; consider extended wear material, a barrier ring, or convexity
- Itching or burning under the barrier — possible irritation or, rarely, an allergy to the adhesive; switching brands or using a barrier wipe can help; persistent symptoms need stoma care nurse review
Pouch features that matter day to day
Beyond the barrier and pouch type, pouches differ in features that often turn out to be more important than the brand itself:
Filter
Most modern colostomy and ileostomy pouches have a built-in carbon filter that allows gas to vent out gradually, eliminating “ballooning”. Filters can wet out and stop working — pouches usually include small stickers to cover the filter during swimming or showering.
Skin-side material
Most pouches now have a soft, fabric-like backing against the skin to reduce sweating and rubbing. Older plastic-only pouches are still made but are rarely a comfortable choice.
Window or transparent vs opaque
- Transparent pouches let you check output without opening, useful in the first weeks after surgery and for monitoring during illness.
- Opaque pouches are discreet under thin clothing and the default for most long-term wearers.
Outlet style
Drainable pouches close with one of three styles:
- Integrated clamp / clip — the closest to the original design; very secure
- Velcro-like roll-up — clean, fast, and pouch-friendly
- Twist-and-lock — newer, very fast, particularly common in two-piece systems
Pre-cut vs cut-to-fit barriers
- Pre-cut barriers come with a fixed opening size — perfect once the stoma has settled into a stable shape
- Cut-to-fit barriers come with a small starter hole that you trim to match your stoma — essential in the first 6–8 weeks after surgery when the stoma is still shrinking
Useful accessories
The right accessories solve more pouching problems than the right brand ever does.
Barrier rings
A pliable doughnut of barrier material that fits around the stoma under the skin barrier. Rings fill in skin creases, scars, retractions, and irregular contours. Probably the single most useful accessory ever invented for ostomy care — many recurrent-leakage problems disappear with the addition of a barrier ring.
Barrier paste or strip paste
Used to fill smaller gaps and creases. Less universal than rings but useful in specific cases. Paste contains alcohol that can sting denuded skin, so let it dry briefly before pouching.
Stoma powder
A fine powder used on damaged or weeping peristomal skin to absorb moisture and create a dry surface for the barrier to stick to. Usually applied lightly, the excess brushed off, often combined with a crusting technique (alternating powder and barrier-spray layers).
Skin-protective sprays and wipes
A thin polymer film that protects the skin from the adhesive. Helpful for sensitive skin or repeated barrier changes; not essential for everyone.
Adhesive remover (sprays, wipes, liquids)
Make barrier changes painless and reduce skin trauma. Most are alcohol- or silicone-based. Important to wash thoroughly with warm water after use so the next barrier sticks properly.
Belts and wraps
A stoma support belt is a flat strip of fabric (often elastic) worn around the abdomen that clips to most pouches and gives extra mechanical security. Useful during exercise, intimacy, work that involves bending and lifting, or simply for confidence. Many people wear a belt every day; others only at specific times. See our ostomy belts guide for more.
Deodorisers
Liquid drops added into the pouch, or filter sprays, that neutralise odour at the source. Modern pouches with filters are usually odour-controlled, but deodorisers are useful for some people, particularly with ileostomy output.
Convex inserts
A separate convex insert that fits into a flat skin barrier — gives convexity flexibility without changing the whole system.
How to measure your stoma
Stomas shrink during the first 6 to 8 weeks after surgery and can subtly change shape later. Measuring regularly is one of the most useful habits for preventing skin irritation.
To measure:
- Wash your hands and remove the existing pouch
- Clean and dry the skin around the stoma
- Use the measuring guide that comes with most pouching products (a card with cut-out circles in 2-mm steps)
- Choose the smallest opening that fits comfortably around the stoma without touching it — typically about 1–2 mm larger than the stoma’s widest point
- Re-measure weekly for the first two months, then monthly until the stoma is stable, then any time you suspect a change
If your stoma is oval, irregular, or asymmetric, a stoma care nurse can help with custom cut templates (often a piece of plastic or paper kept for re-use).
How to apply a pouching system
The steps are the same for most systems:
- Wash and dry your hands. Have all supplies ready before you start.
- Remove the old pouch. Use adhesive remover if the barrier is sticky.
- Clean the skin with warm water and a soft cloth. Pat dry; do not rub.
- Inspect the stoma and skin for changes — colour, swelling, irritation.
- Measure the stoma (especially in the first weeks).
- Prepare the new barrier: cut to size if needed, or attach a barrier ring around the stoma opening.
- Apply skin-protective products if you use them (powder/spray).
- Apply the barrier: peel off the backing, centre over the stoma, press firmly from the stoma outward to remove air pockets, hold flat with the warmth of your hand for 30–60 seconds to activate the adhesive.
- Attach the pouch (for two-piece systems): line up the coupling, click into place, tug gently to check the seal.
- Close the outlet of a drainable pouch, ensuring it’s secure.
Total time: typically 5 to 10 minutes for an experienced ostomate; longer for the first few changes.
Troubleshooting common problems
Frequent leaks
- Re-measure the stoma — most leaks are caused by an opening that’s too big or too small
- Add a barrier ring to fill creases
- Consider switching to a convex barrier
- Review wear time — pushing wear time past barrier capacity causes leaks
- Check for sweat or moisture — extended-wear barriers help in hot climates
- Ask a stoma care nurse to watch a change — they often spot a fix in 30 seconds
Skin irritation or rash
- Cause is almost always moisture under the barrier. Address the leak first.
- Use crusting for weeping skin (powder + barrier spray layers)
- Avoid soap, lotion, and oil-based products on the peristomal skin — they interfere with adhesion
- A stoma care nurse can identify allergic vs irritant dermatitis vs fungal infection
Itching under the barrier
- Often heat and sweat rather than allergy
- Try a different barrier (some brands are noticeably cooler than others)
- Consider a two-piece system so the barrier stays in place longer (less frequent peeling)
Ballooning (gas inflating the pouch)
- The filter is wet — replace the pouch sooner, or use a filter cover during showers
- A faulty filter — switch brands
- Diet — reduce gas-producing foods
Pancaking (output sticking to the top of the pouch)
- Output is too thick to slide down
- Add a small amount of water or a drop of olive oil to the empty pouch when changing
- Try a pouch with internal baffles or a smoother lining
Odour outside the pouch
- A modern intact pouch is odourless when sealed; if you smell it, the seal is failing
- Re-check the barrier fit, the outlet closure, and the filter cover
Where to get supplies
Several international manufacturers produce ostomy pouching systems, with significant overlap in core features. Most run free sample programmes — you can request several systems and trial them at home before deciding which fits your body and lifestyle. Your stoma care nurse can usually arrange samples for you in the first weeks after surgery.
Funding for ostomy supplies varies by country. Most developed healthcare systems cover the cost in full or substantially:
- United Kingdom and most of Western Europe — supplies are funded through the national health service or statutory health insurance, typically free to the patient after a prescription
- United States — usually covered by Medicare under durable medical equipment, and by most private insurance plans; coverage details vary by plan
- Canada and Australia — government schemes cover most supply costs for eligible patients, with details varying by province or state
- Lower-resource settings — funding can be limited; national ostomy associations often have partnerships, donation programmes, or hardship grants worth contacting
A stoma care nurse is the most reliable source of information on what is covered, how to apply, and where to order from in your specific country.
The bottom line
A pouching system is not a permanent decision. Most people try several setups before settling on one that fits their body, output, lifestyle, and preferences. The single most useful action is a relationship with a stoma care nurse who can re-measure, re-fit, and re-trial systems as life changes. With good fit, good skin, and the right accessories, a pouching system disappears under clothing and out of mind — leaving you free to focus on everything else.
Common questions
Frequently asked questions
- What is the difference between a one-piece and a two-piece pouching system?
- A one-piece system has the skin barrier (the part that sticks to the abdomen) and the pouch joined together as a single unit — the whole thing comes off together at each change. A two-piece system has a separate skin barrier and pouch that click together (or attach with adhesive); the barrier stays on the abdomen for several days while the pouch alone can be swapped out as needed. One-piece systems are slimmer and lower-profile; two-piece systems are more versatile and easier on sensitive skin. Both work well — the choice is personal.
- What does 'convex' mean and when do I need it?
- A convex skin barrier bulges outward toward the stoma rather than sitting flat against the skin. The bulge presses gently against the area around a stoma that is flush with the skin, retracted (sunk inwards), or surrounded by skin creases or scars — pushing the stoma slightly outward so that output drops cleanly into the pouch instead of leaking under the barrier. Many people start on a flat barrier after surgery and switch to a convex one if leaks or skin irritation start, typically after a stoma care nurse re-measures the stoma.
- How often should I change my pouch?
- Most one-piece systems are changed every 1 to 4 days. Most two-piece skin barriers stay on for 3 to 7 days, with pouches changed separately as needed. The exact frequency depends on the type of stoma, the type of barrier (standard vs extended wear), how active you are, and the climate. A useful rule of thumb is to change the barrier before it shows signs of failing (peeling edges, melt-out around the stoma, weeping), not after a leak.
- Why does the skin around my stoma get irritated?
- Peristomal skin irritation is the most common ostomy problem worldwide, and is almost always caused by stool or urine reaching the skin under a poorly-fitted barrier. Common fixes: re-measure the stoma (it shrinks for the first 6–8 weeks after surgery), cut the barrier opening more accurately, try a convex barrier if the stoma is flush or retracted, use a barrier ring to fill creases or uneven skin, and review the wear schedule. A stoma care nurse can usually solve most peristomal skin problems in a single visit.
- Do I have to buy supplies from the same brand?
- No — most accessories (rings, paste, powder, adhesive remover, barrier wipes) work across brands. Skin barriers and pouches themselves are usually brand-specific because the snap rings and adhesive flanges are proprietary to each manufacturer. Most countries have free-of-charge or insurance-funded sample programmes so you can try several systems and find the one that fits your body and lifestyle.
- What are the three types of ostomy?
- The three main types are a colostomy, an ileostomy and a urostomy. A colostomy diverts the large intestine (colon) and usually produces firmer, less frequent output. An ileostomy diverts the small intestine (ileum) and produces more liquid, frequent, enzyme-rich output. A urostomy diverts urine when the bladder is bypassed or removed. The type of stoma directly shapes which pouching system suits best — for example drainable pouches for ileostomies and tap-valve pouches for urostomies.
- What is the easiest ostomy bag to use?
- There is no single easiest bag — the simplest system is the one matched to your stoma and dexterity. One-piece systems have the fewest steps because the barrier and pouch come off together, which many people find easiest. Two-piece systems are easier on sensitive skin and let you change the pouch without removing the barrier. Closed-end pouches are simplest for firm colostomy output, while drainable pouches suit liquid ileostomy output. A stoma care nurse can help trial options to find your easiest fit.
- What are ostomy bags made of?
- An ostomy bag has two parts made of different materials. The skin barrier is made from hydrocolloid, a skin-friendly adhesive that absorbs moisture and seals against the skin. The pouch itself is made from thin, odour-proof, waterproof plastic film, usually covered on the skin side with a soft fabric backing to reduce sweating and rubbing. Many pouches also include a small carbon filter that lets gas escape gradually while controlling odour.
References